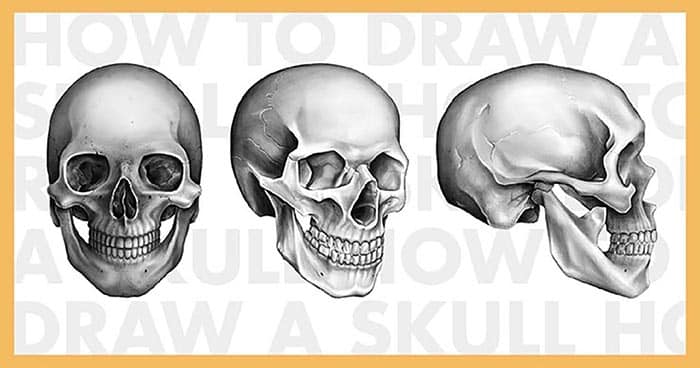
Before using the academic skull reference drawing method to work on a portrait, you need to do some planning. Studying must include geometric shapes, plaster casts of the nose, mouth, eyes, and ears, plaster heads of men and women, and the pattern of the skull, which is the basis of the basics.
To handle these problems correctly, you need to understand the geometric and aerial perspectives, as well as a number of other basic ideas.
Skull Reference Drawing: A Brief Overview
Academic skull reference drawing means that the artist goes from the big picture to the details and then back to the big picture as they finish their work. An instructional image of the skull is made up of three parts: the face, the three-quarter angle, and the profile. This helps people understand the anatomy of a complex three-dimensional shape and how to draw it on a flat piece of paper.
How Important It Is to Draw a Skull
- Learning how to draw a skull is a great way to improve your sketching skills.
- Drawing a skull is a lot of fun because its shape and structure are so interesting and it has so many small, subtle details.
- To understand human anatomy, you need to be able to draw a human skull.
- Drawing a skeleton skull can help us understand why the head is the way it is and help us draw anatomical structures better.
- As we focus on the different small parts of the skull that make it up, our drawing skills will get better.
- Skull drawing also helps us pay more attention to small details.
Why Should You Learn to Draw a Skull?
The building blocks are what hold the drawing together. If you want to draw a head, you need to know the most about the skull. We will show you how to draw a skull. Before you can move on or start drawing the skulls, you need to do these things.
- How to draw a skull: the basics
- How to do things in an easy way
- Do it right every time.
- Tools for Drawing a Skull as a Reference
Here are some important tools for the drawing:
- Mechanical pencil
- Eraser
- Sketchbook
- Ruler
You can use anything you want. You should try out several different materials. It is also suggested to use the suggested materials or ones that are similar. Let’s talk about these tools and why they’re helpful.
| Ruler: You’ll need a good, strong ruler to set up the drawing pattern. | Mechanical Pencil: The best thing is a mechanical pencil. Mechanical pencils are helpful because they make thin lines every time and don’t need to be sharpened. The range of an HB or 2B pencil lead will be enough. |
| Paper or Sketchbook: For a sketch, use paper that is thicker and more durable. The thicker paper makes it much easier to erase than thinner paper. It’s better to use Bristol board or watercolor paper with less texture. | Eraser: Eraser sticks that look like writing tools work best. They are cheap and good for erasing things precisely. |
Steps in the making of the skull
Since the way the bones are built directly affects how the head looks, the main goal of the painter is to understand, remember, and learn how to accurately draw the structure of the human skull.
Make the most of your time learning this information so you don’t make a lot of mistakes when you paint a portrait.
Stage 1
The skull is long and has a round cranium and an extended front part with sockets, jaws, and paired and unpaired bones that are all symmetrical. At this stage, it’s important to know that the paired facial features, like the skull bones, are drawn at the same time.
Stage 2
You can start making a skull by splitting the skull in your reference picture into two separate 3D shapes. First, work roughly, and then clean up. Draw a sphere for the head, then connect it to a shape. Think about how you are now drawing the wires and building the 3D reference skull. You can better understand how these things look in 3D by using vertical lines or center lines.
Stage 3
- Once you’ve filled out the forms, use a soft eraser to wipe them clean.
- If you are using a digital image, lighten the main structure.
- Refer to your skull reference to make a rough drawing.
- Make sure you are using the right amounts. Make sure to draw all of the important parts of the skull as well.
- The proportions are the relationships between the sizes, distances, and places of different shapes and forms.
- Put in the basic shapes for the teeth, the nose, and the eye sockets.
- Also, clarity is more important than neatness; you’ll get there eventually. The more exact you are, the better, but try to keep things simple.
- If you draw too slowly, your lines might not move, making your first drawing look stiff.
Stage 4
You will erase again to make this sketch look better. So, when you get to this smooth skull reference drawing stage, you can trace the drawing more cleanly this time.
Stage 5
Use broad strokes to make the drawing look neat. As you look over your last rough draught, you work on making the lines look better. Keep your focus on the profile line as you describe where the different parts of the skull are.
Make any changes that are needed to improve the accuracy and size of the skull. Again, it’s important to use skulls as a guide. You can also use parallel lines to make some shading.
At this point, the most common mistake is to focus on every single detail while ignoring the rest of the figure. Instead, the work should be done consistently.
Stage 6
After you’ve cleaned your skull well, it’s time to add some line weights. Here are the spots where you can make lines thicker or thinner. In this way, you can bring out the parts and structures of the image that overlap. Try to make sure that the overlaps are correct. Your skull drawing is now done.
Any other skeletal system anatomist may find these steps helpful. Your next step should be to find out more about skulls. Use the same method to pull out references from different points of view.
Conclusion
To make a skull, you need a reference drawing of a skull. To draw a skull easily, you need to follow a few simple steps.


